TypeScriptでSlack Appを作成してみたので、その方法の紹介です。
作成したアプリはこちら
https://github.com/irori-dev/SlackApp
今回の記事では、ローカルの環境構築までをやっていきます。
単語紹介
Bolt
Bolt は Slack API を使いやすくするために公式が提供している Node.js のフレームワークです。 一から API を使ってアプリを開発していくことと比べると、このフレームワークを使うともっとサクっと作っていくことができると思います。
https://slack.dev/bolt-js/ja-jp/tutorial/getting-started
今回は、こちらを使用してTypeScriptでアプリを作っていきます。
事前準備
Macを使用しています。
- npmが使える状態にしておく
brew install autosshでautosshが使える状態にしておく
1. まずは動く状態にしよう
この記事を参考にすると詳細もわかってより良いかもです。
https://blog.solunita.net/posts/develop-slack-app-comfortably-fast-with-bolt-and-typescript/
今回はsampleSlackBotディレクトリを作成してその中で作っていきます。
mkdir sampleSlackBot

cd sampleSlackBot

npm install typescript @slack/bolt
ここまでで、以下のようなディレクトリ構成になっていることを確認してください。
sampleSlackBot
├── node_modules
├── package-lock.json
└── package.json
次に、tsconfig.jsonを雑に作成します。
{
  "compilerOptions": {
    "outDir": "./dist",
    "module": "commonjs",
    "moduleResolution": "node",
    "removeComments": true,
    "noImplicitReturns": true,
    "noUnusedLocals": true,
    "sourceMap": true,
    "strict": true,
    "target": "es2017",
    "noImplicitAny": false
  },
  "compileOnSave": true,
  "exclude": [
    "node_modules",
    "**/*.spec.ts"
  ]
}
これで、./dist に吐き出した結果をまとめるようにしました。
次に、slackアプリを作成します。
ここが結構新しくなっていて苦戦したところなのですが、以下の手順で作成します。
1-1. https://api.slack.com/apps にアクセスして、「Create New App」をクリック
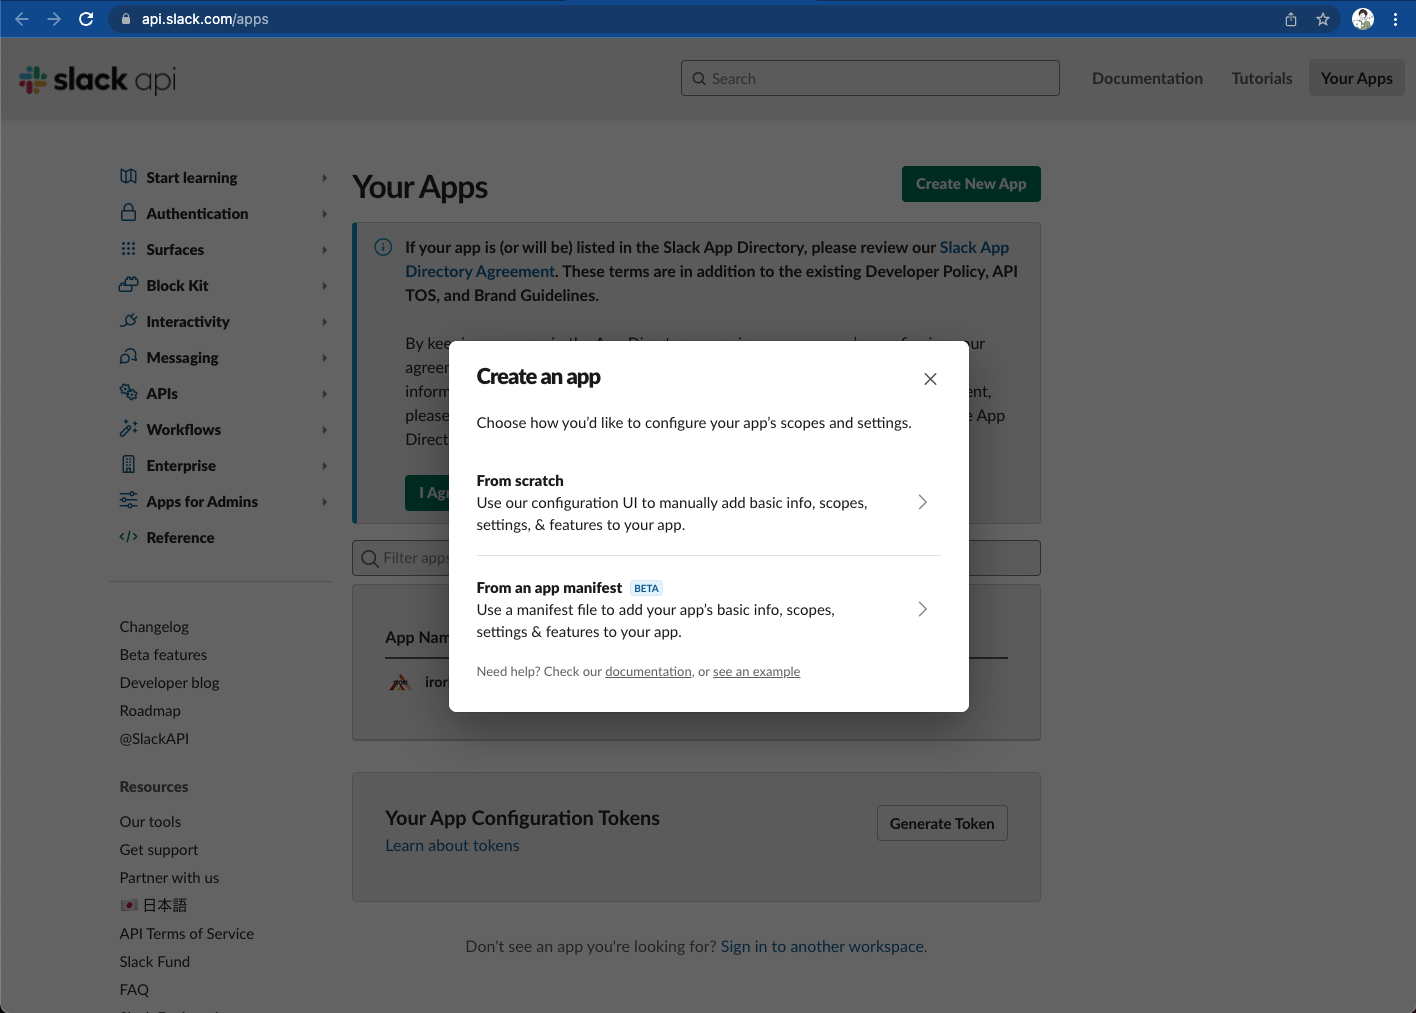
1-2. 「From an app manifest」を選択し、manifestを以下に変更する
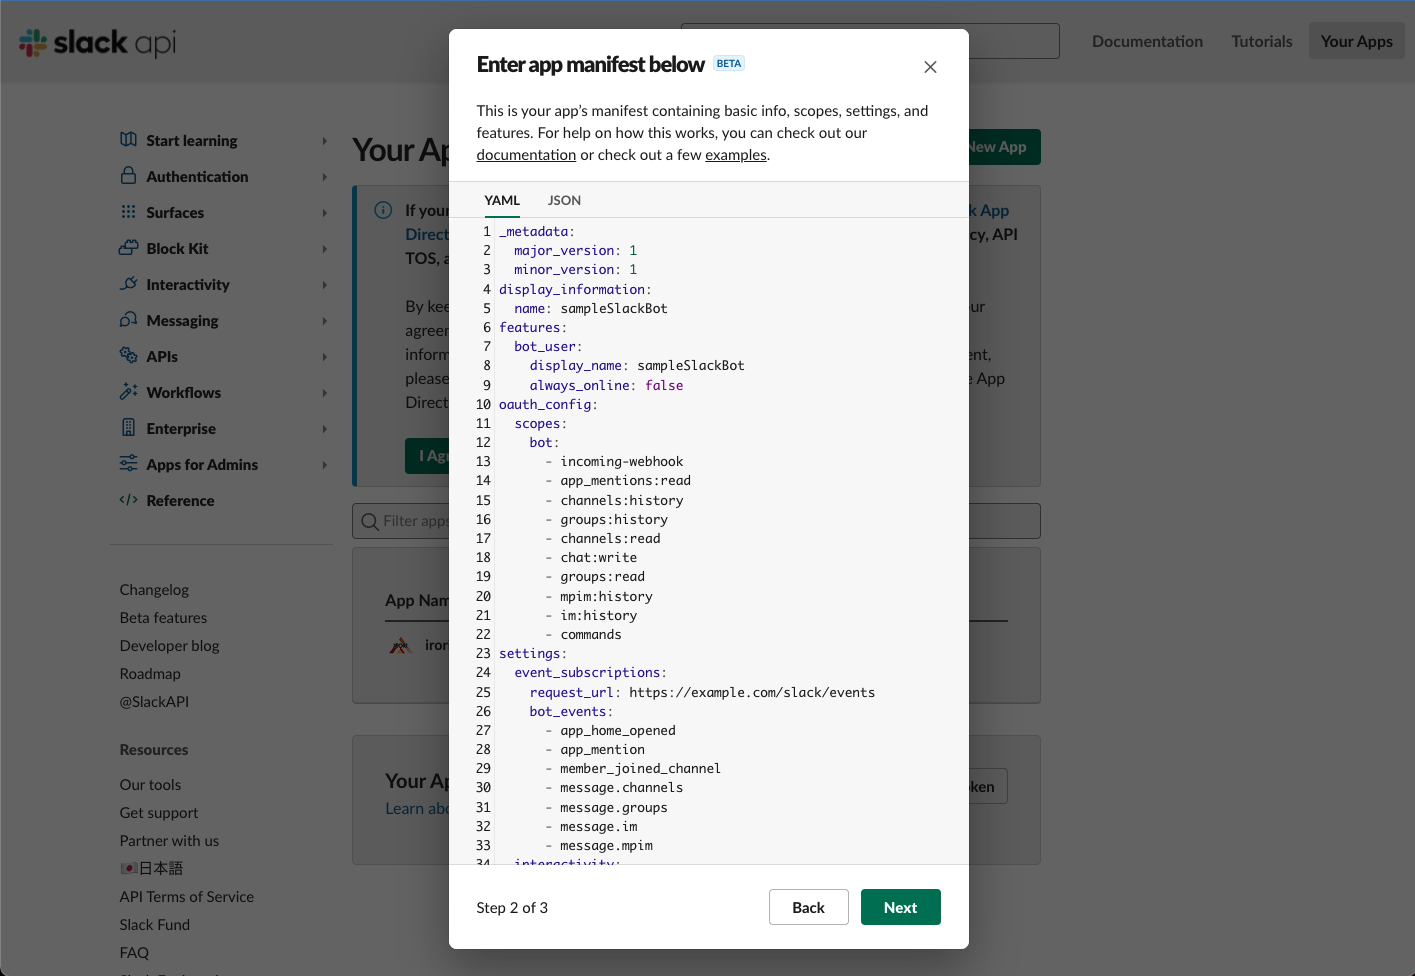
(後でhttps://example.com/slack/eventsの場所は書き換えます)
_metadata:
  major_version: 1
  minor_version: 1
display_information:
  name: sampleSlackBot
features:
  bot_user:
    display_name: sampleSlackBot
    always_online: false
oauth_config:
  scopes:
    bot:
      - channels:read
      - channels:history
      - chat:write
settings:
  event_subscriptions:
    request_url: https://example.com/slack/events
    bot_events:
      - message.channels
  interactivity:
    is_enabled: true
    request_url: https://example.com/slack/events
  org_deploy_enabled: false
  socket_mode_enabled: false
  token_rotation_enabled: false
この設定で、とりあえずチャンネル内のメッセージを読み込んで返信ができる状態になります。
1-3. SLACK_SIGNING_SECRETとSLACK_BOT_TOKENを取得する
manifestを入れた後の画面で、そのまま下にスクロールするとSigning Secretがあります。これが**SLACK_SIGNING_SECRET**です。
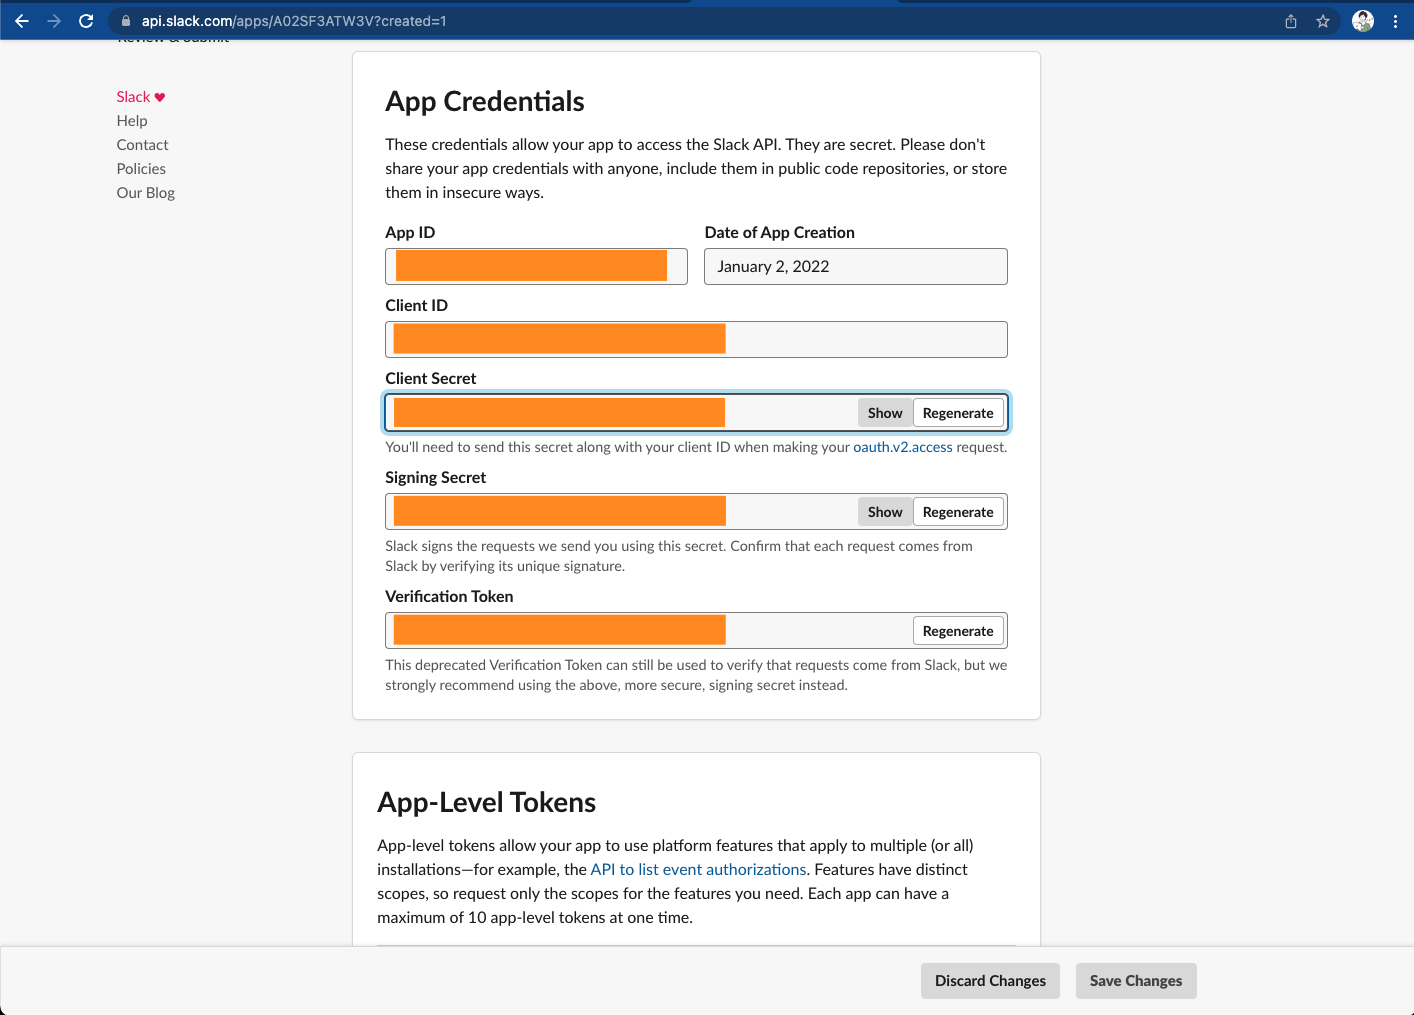

サイドバーのOAuth & Permissionsをクリックし、OAuth Tokens for Your Workspaceをクリックします。
適当にチャンネルを選択した後、Bot User OAuth Tokenが作成できるのでそれが**SLACK_BOT_TOKEN です。**
これを探すのに無駄に1時間くらい使った…
1-4. 一旦動かす
この状態で一旦動かしてみましょう。
まず、src/index.tsを作成します。
const { App } = require(`@slack/bolt`)

// Initializes your app with your bot token and signing secret
const config = {
  token: "xoxb-......", // SLACK_BOT_TOKENを一旦ベタがき
  signingSecret: "18e...", // SLACK_SIGNING_SECRETを一旦ベタがき
}

const app = new App(config)

// Start your app
;(async () => {
  const server = await app.start(8080)

  console.log(`⚡️ Bolt app is running! PORT: ${server.address().port}`)
})()

const ping = (): void => {
  app.message(`sample ping`, async ({ _message, say }): Promise<void> => {
    await say('pong')
  })
}

ping()
package.jsonに以下のようにscriptを追加します。
{
  "scripts": {
    "prestart": "tsc -p .",
    "start": "node ./dist/index.js"
  },
  "dependencies": {
    "@slack/bolt": "^3.8.1",
    "typescript": "^4.5.4"
  }
}
その後、% npm run start を実行すると以下のようになるはずです。
% npm run start

> prestart
> tsc -p .


> start
> node ./dist/index.js

⚡️ Bolt app is running! PORT: 8080
この状態で、slackに登録できるURLを生成するために、autosshします。
localhost.runというサービスを利用します。
% autossh -M -0 -R 80:localhost:8080 nokey@localhost.run

===============================================================================
Welcome to localhost.run!

Follow your favourite reverse tunnel at [https://twitter.com/localhost_run].

**You need a SSH key to access this service.**
If you get a permission denied follow Gitlab's most excellent howto:
https://docs.gitlab.com/ee/ssh/
*Only rsa and ed25519 keys are supported*

To set up and manage custom domains go to https://admin.localhost.run/

More details on custom domains (and how to enable subdomains of your custom
domain) at https://localhost.run/docs/custom-domains

To explore using localhost.run visit the documentation site:
https://localhost.run/docs/

===============================================================================


** your connection id is 63b18e2d-ce2e-40ba-86fa-b3f1b2e37396, please mention it if you send me a message about an issue. **

20f97af58f65cb.lhr.life tunneled with tls termination, https://20f97af58f65cb.lhr.life
最後にある、https://20f97af58f65cb.lhr.life をslackのBot側に設定します。
(URLはそれぞれの設定に合わせてください。)
slackのApp Manifestを選んで以下のように修正します。
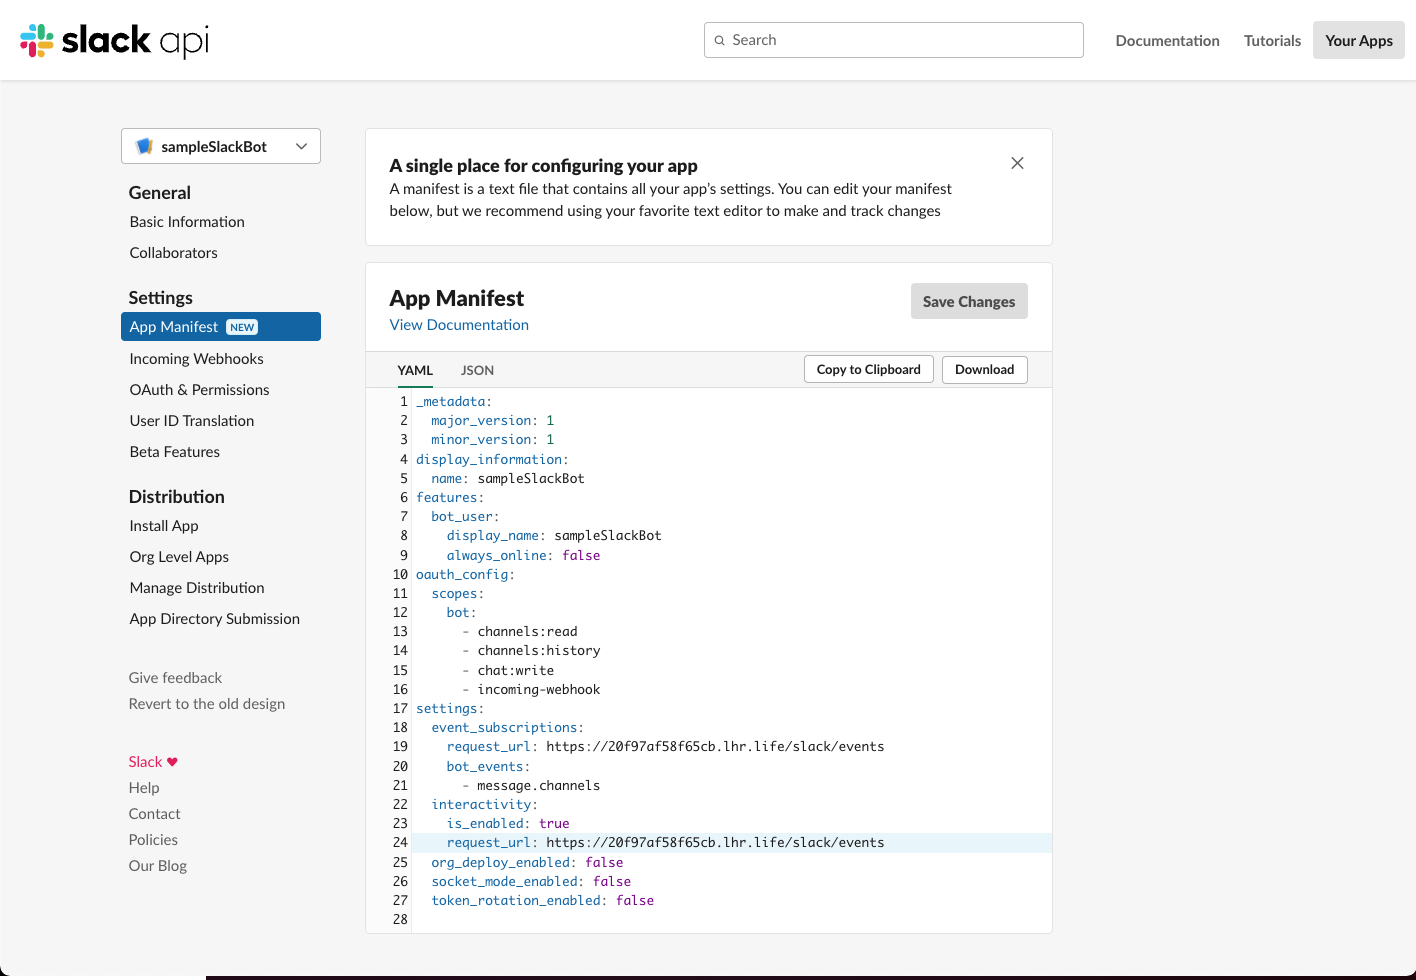
_metadata:
  major_version: 1
  minor_version: 1
display_information:
  name: sampleSlackBot
features:
  bot_user:
    display_name: sampleSlackBot
    always_online: false
oauth_config:
  scopes:
    bot:
      - channels:read
      - channels:history
      - chat:write
      - incoming-webhook
settings:
  event_subscriptions:
    request_url: https://20f97af58f65cb.lhr.life/slack/events # ここと
    bot_events:
      - message.channels
  interactivity:
    is_enabled: true
    request_url: https://20f97af58f65cb.lhr.life/slack/events # ここを修正します
  org_deploy_enabled: false
  socket_mode_enabled: false
  token_rotation_enabled: false
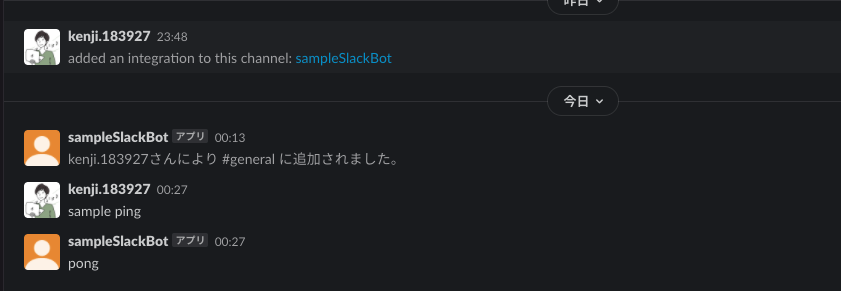
この状態で、botの招待後slackにsample ping と入力してpong が返ってくると成功です🎉
2. もっと便利にしよう
ここまでで、一旦動く状態にはなりましたが実装を進めるにはまだまだ不便なので、もう少し便利にしていきましょう。
% npm install --save-dev nodemon ts-node

% npm install dotenv
それぞれの設定ファイルを作成して、修正していきます。
2-1. dotenv関連
SLACK_SIGNING_SECRET=*****************************
SLACK_BOT_TOKEN=xoxb-********************************
const { App } = require(`@slack/bolt`)

// Initializes your app with your bot token and signing secret
const config = {
  token: process.env.SLACK_BOT_TOKEN,
  signingSecret: process.env.SLACK_SIGNING_SECRET,
}

export const app = new App(config)
import { app } from './initializers/bolt'

;(async () => {
  // Start your app
  const server = await app.start(8080)

  console.log(`⚡️ Bolt app is running! PORT: ${server.address().port}`)
})()

const ping = (): void => {
  app.message(`sample ping`, async ({ _message, say }): Promise<void> => {
    await say('pong')
  })
}

ping()
2-2. ts-node、nodemon関連
Bolt: npm run watch
Serv: autossh -M -0 -R 80:localhost:8080 nokey@localhost.run
{
  "scripts": {
    "prestart": "tsc -p .",
    "start": "node ./dist/index.js",
    "watch": "nodemon",
    "dev": "nf start"
  },
  "dependencies": {
    "@slack/bolt": "^3.8.1",
    "dotenv": "^10.0.0",
    "typescript": "^4.5.4"
  },
  "devDependencies": {
    "nodemon": "^2.0.15",
    "ts-node": "^10.4.0"
  }
}
この状態で、何も起動していない状態から再度% npm run dev するとこんな感じになるはずです。
% npm run dev

> dev
> nf start

[OKAY] Loaded ENV .env File as KEY=VALUE Format
12:52:52 AM Serv.1 |  Pseudo-terminal will not be allocated because stdin is not a terminal.
12:52:52 AM Bolt.1 |  > watch
12:52:52 AM Bolt.1 |  > nodemon
12:52:52 AM Bolt.1 |  [nodemon] 2.0.15
12:52:52 AM Bolt.1 |  [nodemon] to restart at any time, enter `rs`
12:52:52 AM Bolt.1 |  [nodemon] watching path(s): src/**/*
12:52:52 AM Bolt.1 |  [nodemon] watching extensions: ts
12:52:52 AM Bolt.1 |  [nodemon] starting `node --inspect -r ts-node/register ./src/index.ts`
12:52:52 AM Bolt.1 |  Debugger listening on ws://127.0.0.1:9229/fe108b8d-725b-422e-b332-4c9e1e52bc9b
12:52:52 AM Bolt.1 |  For help, see: https://nodejs.org/en/docs/inspector
12:52:53 AM Bolt.1 |  ⚡️ Bolt app is running! PORT: 8080
12:52:53 AM Serv.1 |  ===============================================================================
12:52:53 AM Serv.1 |  Welcome to localhost.run!
12:52:53 AM Serv.1 |  Follow your favourite reverse tunnel at [https://twitter.com/localhost_run].
12:52:53 AM Serv.1 |  **You need a SSH key to access this service.**
12:52:53 AM Serv.1 |  If you get a permission denied follow Gitlab's most excellent howto:
12:52:53 AM Serv.1 |  https://docs.gitlab.com/ee/ssh/
12:52:53 AM Serv.1 |  *Only rsa and ed25519 keys are supported*
12:52:53 AM Serv.1 |  To set up and manage custom domains go to https://admin.localhost.run/
12:52:53 AM Serv.1 |  More details on custom domains (and how to enable subdomains of your custom
12:52:53 AM Serv.1 |  domain) at https://localhost.run/docs/custom-domains
12:52:53 AM Serv.1 |  To explore using localhost.run visit the documentation site:
12:52:53 AM Serv.1 |  https://localhost.run/docs/
12:52:53 AM Serv.1 |  ===============================================================================
12:52:53 AM Serv.1 |  ** your connection id is 8bbbace7-8c5a-4258-b277-9461f55fc018, please mention it if you send me a message about an issue. **
12:52:54 AM Serv.1 |  769e8c15a08c99.lhr.life tunneled with tls termination, https://769e8c15a08c99.lhr.life
これで、再度slackに設定しているURLを変更すると、動的に更新できる状態になっているはずです。
試しに、以下のように変えてみましょう。
(起動した状態で試してみてください。)
import { app } from './initializers/bolt'

;(async () => {
  // Start your app
  const server = await app.start(8080)

  console.log(`⚡️ Bolt app is running! PORT: ${server.address().port}`)
})()

const ping = (): void => {
  app.message(`sample ping`, async ({ _message, say }): Promise<void> => {
    await say('pong:tada:')
  })
}

ping()
この状態で、再度slackでsample pingと入力してみましょう。
以下のようになっていれば成功です🎉

今回はこのあたりで終了です。
次は、GAEへのデプロイと、その後GitHub Actionsからのデプロイをできるようになるような記事を書く予定です〜🙆♂️
次回の記事はこちら
![[TypeScript] BoltでSlack Appを作成する ②GAEにGitHub Actionsでデプロイする](/assets/ogp/typescript-slack-app-2.webp)
![[TypeScript] BoltでSlack Appを作成する ③GitHub APIを叩いてGAEにデプロイする](/assets/ogp/typescript-slack-app-3.webp)
![[TypeScript] BoltでSlack Appを作成する ④Notion APIを叩いてタスク一覧を取得する](/assets/ogp/typescript-slack-app-4.webp)